Welcome to part two of my scratchbuilding tutorial. Although only trial-and-error will teach you the nuances of how the process works, it is my hope that I can provide you with a foundation that will both help you avoid some of the big mistakes I made while learning, and show you that it's really not that difficult after all.
A note about the photos. They're not all from the same building! They were taken at random during the construction of an entire town for a convention this winter, at which time I had no idea I'd be writing this article. They illustrate the techniques, but not the construction of any one particular building.
The first step is to design the building on paper. A 40mm scale saloon should be about six inches wide and seven inches deep. I design the floor to sit inside the walls rather than using the floor as a platform for the walls. I design the side walls to be the same length as the floor and the front and back walls to go on last and cover the ends of the sides (they need to be wider by double the thickness of the walls, 3/16", in order to cover them; so instead of 6 inches wide, make the front and rear walls 6 3/8" wide). The walls should be about 3" tall, and the roof is made by cutting out a triangular truss and gluing two roof plates to it.
Your basic measurements for aforementioned saloon would be:
Floor: 6 x 7"
2 side walls: 3 x 7"
Front, 7 x 6 3/8
Rear: 6 3/8" wide. 3" tall on each side and 5" tall at the peak.
Roof: One panel 7 1/4 x 4" and another 7 1/4 x 4 3/16 . The wide panel will overlap the narrow panel at the peak, although the angle will not be perfectly 90%. You will need to trim the excess a bit.
Truss: a little triangular piece three inches long on the bottom and the same angle as the peak of the back wall.
Should I every really get ambitious, I will create a file of "blueprints." You can create your own designs by studying photographs of old western buildings or using commercially available cardstock buildings such as Whitewash City as a pattern, making adjustments to account for the 3/16" wall thickness.
Once the basic design is made, mark your foam core, making sure everything is square. Slice the pieces out with a razor knife. Take care not to slice your fingers off during this step, since it slows down the remainder of the process and leaves nasty stains on the finished model.
Last time, I gave you a laundry list of tools and materials. Not included on that list were ready-made architectural elements. I recommend using pre-assembled plastic or metal windows and doors--they don't cost a lot, and save you a lot of time. I've found that building the windows and doors is the most time-consuming part of scratchbuilding.
If you are using ready-made architectural elements like these, mark their position carefully on the walls and make the cuts before assembly of the building . Make sure you have thought through what part of the window or door needs to be recessed, so that you don't end up cutting a hole too large. Test fit before you continue assembly in case you need to throw out a wall and start over.

After the cuts are made, do your basic assembly with a hot glue gun, wiping off the excess before it hardens (don't use your fingers!). The photo below is sans its front so you can see how it is constructed, and its roof, which will not be attached to the building permanently. At this stage, it is quite imperfect; don't let this discourage you; the siding and details will cover the imperfections.
It is important to assemble the building completely before gluing on the siding. Assembly helps protect the walls from warping, since they are held straight on three edges.
After the building is assembled, measure and cut siding. I do it in large batches, which saves time in the long run.
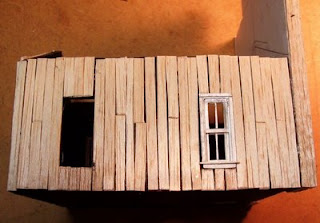
When cutting trim, I use the snips a lot. I tend to keep them in one hand and snip about every third piece in half to create butt joints in the middle of the wall for a nice rough look. I don't worry about cutting each piece of siding to precise length during gluing. Rather, I leave the siding hanging over the top and trim the entire wall at once after the glue dries. This one simple technique saves an immense amount of time and fuss.
Glue the siding in place. To minimize warping, take care not to use more glue than you really need to get the siding to stick. If a piece of siding wants to curl, super-glue the ends in place while the white glue dries. Trim out the corners with additional balsa.
Using ready-made or homemade architectural elements, trim out the building. Super glue is very useful for securing these delicate parts. I have used Grandtline's porch railings and gingerbread trim to great effect, and I use my own Knuckleduster pre-cast windows and doors. Trim work requires some research. I have found numerous photos of old buildings on the web.
Next time we'll make a cedar shake roof.
Until then, Adios!
Ol' Knuckleduster


No comments:
Post a Comment