Tuesday, October 20, 2009

Knuckleduster's 28mm Lawmen of Tombstone


Here are some photos of my latest 28mm pack. It includes the Earps, Doc Holliday, and Sheriff Johnny Behan. These are based on the historical characters, and not the actors. For instance, Virgil Earp did not look anything like he did in Tombstone. He was full in the face. Wyatt is shown here as he was the day of the gunfight, carrying his gun without a holster.

Doc takes aim.

A wounded version of Virgil.


 . . . and of course, Wyatt.


I hope you enjoy these; I had fun sculpting, painting, and mounting them. They are available from Knuckleduster.com or RLBPS.com.

One more note, if you had the original Knuckleduster Earp pack, you will note that the figures have been slightly re-sculpted, and more figures have been added; Behan, Doc, and the prone/wounded version of Virgil which gives you a wounded marker or diorama figure.

Adios!


Saturday, August 8, 2009

Banditos!


This is the first new post in awhile, and I apologize. Vacations, trips to conventions, and contract casting have taken their toll on my sculpting and blogging. I'm happy to announce the release of my first new 40mm set in a couple of months.

What Old West setup would be complete without Banditos! First a small history lesson. Real banditos were not dressed as we see in the movies. The greatest of them all, Joaquin Murrieta, of Old California, dressed like an ordinary businessman of 1854, albeit rather dusty, with no special pinache. No sashes, no conchos, no panchos.

Well, what fun it that? I've chosen to give my banditos the full-tilt Frito-Bandito treatment.

First off, they represent three iconic Latino character types of the Old West. The character with the multi-colored blanket is a Vaquero, or Mexican cowboy. The second is an old California Haciendo, wearing fancy duds (perhaps outlaws have crashed his wedding). The character with crossbelts is one of Ponco Villa's men, a "Villista." They have plug hands which are interchangeable. Each set comes with seven hands: Right: Winchester, Peacemaker one, Peacemaker two. Left: Whiskey bottle, open hand, Peacemaker, cap and ball Colt. The middle figure has an alternate head which is bare. The hats must match the costume for them to be culturally correct, so the other heads are fixed.

The were fun to paint because of the patterns in the blanket and trousers, and because of the fancy stitching and piping on the jackets. If I get around to doing mounted versions, I'll try my hand at a fancy fiesta saddle!

Until next time,
Old Knuckleduster

Thursday, April 23, 2009

Wild Bill Hickok

Of all the western characters I've sculpted, I keep coming back to Wild Bill Hickok. I've sculpted him in three different scales. If you are an artist, perhaps you can see why; the windswept and interesting hair, the dramatic clothes, the unique face, and his uniquely Victorian notion of manhood, expressed plainly in everything from his posture to his dispassionate, but not unpleasant visage.

Here's my 40mm Wild Bill, seen from four angles.


This figure is from KOW48-012, Heroes I. The base is a simple metal washer, and the basing was done by sprinkling sand over white glue, and dry-brushing from medium brown to tan. A tuft of static grass is the one patch of weeds growing in Abilene's street at didn't managed to get eaten by a cow or trampled by a horse.


Wild Bill is interesting to paint because of his penchant for fancy duds. I set off his Prince Albert frock coat with a faint line of gray piping which is not actually sculpted onto the figure. In one famous photo he's shown with plaid trousers, which I did my best to paint (although I chose a slightly different plaid than the one in his photo). His hat is a popular style known at the time as the "Boss of the Plains," or "Boss of the Prairie." It features a low crown but a wide brim, and was usually tan, gray, or white. It pre-dates the Stetson.


His hair was auburn. I began with a dark brown undercoat, a burnt-sienna medium tone, and for highlights mixed burnt-sienna with yellow ochre.

Wild Bill's most famous post was Abilene, the summer of 1871. Cowtowns were dusty, except when they were muddy. His shoes, trousers, and the bottom edges of his coat were dry-brushed with a very faint mix of medium brown and yellow ochre to depict the  ever-present filth which was impossible to avoid, regardless of how dapper you tried to be.

His guns are nickel-plated Navy revolvers, with ivory grips. He fastidiously maintained these weapons, making sure they worked when called upon. I have fired a replica Colt's Navy 1851 revolver, the model he used, and I managed a misfire rate of about 50%! He took great pains to clean, shoot, clean again, and reload his pistols every morning to be sure the cap popped, the spark reached the chamber, and the powder ignited.

All the best,
Forrest
Knuckleduster Miniatures 

The Lincoln County War

From 1878 to '81, gang warfare raged across central and southern New Mexico. Billy the Kid, enraged by the murder of his mentor, John Tunstall, formed a posse (of dubious legality) and exacted revenge on Lawrence Murphy and James Dolan's faction, which included not only local cattlemen, but the county Sheriff's department and others in positions of power. The movie Young Guns contains many historical innacuracies, but captures the essence of the conflict and characters pretty well.
Knuckleduster's latest figure set pays tribute to the conflict in 40mm scale.


First we have Billy, himself. He has been depicted in the movies many ways, however the only evidence we have of his appearance is a photo which shows a small, ugly young man with a rumpled hat and over-sized cardigan. (If you ever see this photo, be sure to keep in mind that some versions of it are reversed left to right; he was right-handed). He had buck teeth, so pronounced, he "could eat corn through a picket fence," as the saying goes. 


The challenge in sculpting Billy was making the cardigan look like a sweater and not a jacket. I accomplished this by giving it a ridged texture that can be dry-brushed to achieve a cable-knit look. I've sculpted several different types of chaps on my figures. The most dramatic are batwing chaps (see KOW48-02, Cowboys), which require conchose and rawhide ties down the side. Some folk like their chaps with fringe down the side as well. I'm currently putting highly ornamented Vaquero chaps on some Banditos. Billy's are simple, workmanlike shotgun chaps, belonging to a lowly cowhand. One of these days, I'll try my hand at wooly chaps, and the knee-length "chinks" (coincidental resemblence to the racial slur of the same name), rarely depicted in the movies, but used often.

Another challenging part of this sculpt is the awkward backward draw he's doing with his right hand. This comes from a contemporary illustration, which I altered only in making the hand anatomically correct; the Police Gazette illustrator had given him two left hands. This type of draw was more popular than you might imagine, but for the life of me I can't imagine why.


Next, we have one of Billy so-called "Regulators," Jose Chavez Y Chavez. He met his end on account of having borrowed Billy's hat, reportedly a sombrero with a green band. What was known as a sombrero then and now are slightly different, and any cowboy hat might be called a sombrero in those days. In any case, Jose was mistaken for Billy and shot on sight.  His last words were, "I wish . . . I wish . . . " Historians have mused that he meant, "I wish I hadn't borrowed that damn hat." He's wearing no hat at all in this interpretation; it's not too late for him to avoid his fateful decision. His jacket is probably an old Mexican or French military coat.

Finally, we have Pat Garrett, the lawmen that cornered Billy and shot him in his hotel room in 1881. Garret was a tall man who suffered from an inflated ego and unbridled ambition. Dee Harkey, a lawmen from a nearby county, considered him a "mankiller," who was too quick to resort to the use of lethal force. In the case of Billy, however, Garrett's instincts may have been right on the money. Billy was unpredictable, reckless, and had killed several lawmen already. Pat is depicted shooting Billy in his bed, giving him the "coup de grace," so to speak.
One of these days, I'll post painted examples of these fellers in action!

Adios, amigos
Forrest Harris
Knuckleduster


Friday, April 17, 2009

Monetize Your Miniatures; Commercial Clutter on Front Street

I want my Western Town to look like someone lives there. A western town's Front Street (a.k.a. The Row) was no different than Main Street, or "The Strip" is today in a town like Ruidoso, Laramie, or Durango. Advertising is and was rampant, and the thing missing from my town until recently has been the commercial clutter that is the inevitable result of economic activity. In short, I have begun to "monetize" my buildings.


Of course you must have a sign on any commercial buildings. Most lettering in those towns was simple, but examples of fancy brushwork can be found easily enough. Time-Life books and internet image searches should give you plenty of examples to paint your own signs from. If you don't have a steady hand, make your own signs in Photoshop and print them on cardstock. 

Smaller signs were everywhere on commercial buildings in the Old West. It seems that everyone sold cigars or tobacco and advertised the fact. Saloons might have signs proclaiming their Faro (card game), Billiards, Whiskey, or Dancing. 


My latest addition to the mining town of Knuckleduster is poster art. Large posters were "pasted" up by circus or theater promoters in advance of a show. 


Wanted posters certainly deserve a prominent place. It takes a bit of inestinal fortitude to permanently glue a piece of paper to the side of a model you just spent a week building, but the results are worth it and besides, life now or in the Old West is not tidy. 


Adios!
Forrest Harris
Ol' Knuckleduster

Piebald Horse and Rider

Howdy,
This here's what's called a Piebald horse. Piebald isn't a breed; it's any horse with black and white coloring. White with any other color is called a Skewbald (for instance, white and brown, or white and bay). In the Old West, your Piebalds would  likely be a quarter horse or Indian pony.


When painting horses, I'm careful not to leave the shadows too dark. I used to dry-brush my mid-tones directly over my dark undercoat, leaving all shadows the very darkest value. This approach worked just fine with bays, browns, or blacks, but not so well with white, palomino, or dappled greys. The extremely dark creases looked less like shadows and more like mistakes. 

This piebald has large white patches, to which I applied a grey first coat, being sure to completely paint over the underlying dark undercoat. Next, I painted a lighter shade of grey on all but the deepest recesses, and finished off with bright white on the higest spots.


The black part of the horse was done with a black undercoat and two shades of grey, the final shade being a mere dusting with a dry brush over the tips of the mane and tail. The hooves were done with two shades of a greenish-grey, starting with a fairly dark shade. Horseshoes were painted on because I'm using 40mm figures, and the figure wouldn't look finished without them.

The figure is from the pack KOW48M-031, Outlaw With Pistol. His matching dismounted pose is from KOW48-3, Outlaws (the raggety white edge is because I clipped him out of a photo with two other figures).

I gave him a striped vest. I like to add some kind of pattern to an item of clothing on every figure, even if it's only a bandanna. Many people can do this well on a 28mm figure; I just don't happen to be one of them. 40mm gives me a bit more elbow room. It's also fun to run a fine line around the edges of the fabric as if it were piped or trimmed out "extry fancy." 

His boots are called "Napoleon" boots, and are characterized by the high front peak and high heel, small in size and set back on the shoe fairly far. They were a popular style during and after the Civil War. The boots worn during the 1870's and 80's more closely resembled cavalry boots than what we call "cowboy boots" today.

Until next time,
Forrest Harris
Ol' Knuckleduster

Thursday, April 16, 2009

New Greens

Howdy one and all,
I've been busy sculpting more 40mm figures. Here are three upcoming releases. I received a request to show more longarms being fired from the shoulder, so I've put together this set, which includes a big old ranch hand in a ten-gallon hat (let's call him Hoss),  a character with a sawed-off shotgun and a Mississippi riverboat gambler's hat, and Teddy Roosevelt. I went with the instantly identifiable Rough Rider hat, although when he made his famous outlaw capture in the badlands, he was wearing a fur cap, which is far less comfortable in an Arizona gunfight.


If you like my 28s, fear not; I will be sculpting more of them eventually. I haven't given up on them. I will say, however, that I'm learning a lot in 40mm, and I'm sure my 28s will benefit.

Here's one of the figures from an upcoming "Lincoln County War" set. I've included a photo of his green, and on of the finished painted sample (pardon the unpainted base).


Next up, I'm sculpting 40mm banditos, vaqueros, haciendos, and Villestas. Rumor has it, I'll be putting out a line of 40mm buildings. I'm constructing them with cost containment in mind, and my goal is to provide them at  a price lower than comparable 28mm buildings.

Adios!
Ol' Knuckleduster

Tuesday, March 17, 2009

Sculpting Pistols

Howdy, pilgrims,
Today's post concerns the way pistols are depicted on 40mm miniatures. One of the challenges of sculpting any military miniature is making weapons to scale. If gun barrels were 1:48th the diameter of a real .45 caliber pistol barrel, it would be as thin or thinner as a guitar string. Even if you could cast it reliably, it would be so fragile it would snap off with the slightest handling. Here are some photos of people holding real weapons.

First, a so-called "Pocket Navy." If you are playing Warhammer's Legends of the Old West, it would be a typical "sixgun". They were popular weapons because of the speed with which they could be brought into action. Large guns like the Walker Colt were totally impractical as a street fighting weapon due to their bulk:


Here are a number of Colt's cap-and-ball pistols. Notice the variety of sizes available:


Here's a feller on horseback carrying a Peacemaker. Notice how small the gun appears in his hand, especially with the large animal in close proximity:


This reenactor is firing a Peacemaker (or perhaps a Frontier), considered a "Heavy Pistol" in Warhammer's Legends of the Old West:


Finally, here's another "heavy pistol" as defined by LOTW; in this case, a Colt's 1851 Navy:


It's easy to see how delicate a gun diligently modeled to scale would be when scaled down. Sculptors, therefore, have to make compromises. Guns have to be made thicker to be durable, but not so large as to resemble artillery. When you make a gun thicker, you have to be careful how long you make it, otherwise the visual effect produced by the overall massiveness of the gun will make the entire figure look ridiculous. Here are four types of guns I have sculpted for Knuckleduster's 40mm figures:

First, a LOTW "sixgun"; in this case, an 1851 Colt's Navy Sheriff's Model.  I have chosen to use small sixguns like these on a number of my sculpts:

Next, a .45 Peacemaker with a 7.5"-length barrel:


Here's a derringer (the generic term; the first company to produce them was called "Deringer," with one "r"):


Finally, here's a full-size Navy revolver:


Finally, a figure on horseback holding a Pocket Navy. Compare this figure to the mounted reenactor previously shown:

The real advantage of 40mm over 28mm, is that weapons can be made a bit more delicate while still retaining the strength needed for handling.

I'd like to put in a good word for the Single Action Shooting Society (SASS).  Some of the reenactors pictured on this post compete in Cowboy Action Shooting, a championship target shooting sport which a lot of really nice guys participate in all over the world. The skill, knowledge, and safety record of this organization really can't be beat. We toy soldier people can learn a lot from what they do. More info is available at http://www.sassnet.com/index.php

Until next time, Adios!
Forrest Harris
Ol' Knuckleduster


Sunday, March 15, 2009

Johnny Fandango


Howdy,
Here are a few photos of Johnny Fandango, a character I created from Knuckleduster's Outlaws packs (mounted and dismounted). He is meant to be a Texas outlaw of the sort that roamed the Southwest in the 1880's. There were many loosly-affiliated bands of outlaws who operated in West Texas, New Mexico, and Arizona during this period, rustling, robbing, and causing considerable mayhem. The "Cowboys" of Tombstone fame are typical of the breed.

This hobre features a really capital horse, and a fancy stitched coat. For the stitiching, I chose the "yellow rose of Texas" theme. The roses can be seen in various places on the coat (sorry about the photo quality--I'm still learning). He's toting a pair of Colt's cap and ball "Pocket Navies," which are quick to bring into action. 

The next photo shows another character I created with the same body, but a different head.
Adios!
Ol' Knuckleduster

New Knuckleduster Greens


Howdy, folks!
It was recently suggested to me that I should post my work in progress. I've never been in the habit of doing so, but I can understand how it might be fun to get a sneak peek of what's coming down the pike.

These four characters are among six new items I hope to have finished within a couple of weeks. The are, from left to right, Pat Garrett, Chavez, Rancher's Daughter, and Billy the Kid. Billy will come with a number of different heads, since he has been portrayed many different ways (with many different hats).

I have many other pieces on the workbench, however I'm not at liberty to display them since they are private commissions. I'd be happy to answer questions you might have about these sculpts, or to take suggestions for future projects. Drop me a line at knuckledusterharris@gmail.com or post a comment on this blog.

All the best,
Forrest Harris
Ol' Knuckleduster

Basic Scratchbuilding, Part III; Cedar Shake Roof Construction

A cedar shake roof is a bit tedious, but it well worth doing, and not as hard as it looks.

I cut the shakes en masse to begin with. Each course is about an inch long. To make life easier, I first cut one-inch swaths across the grain of a wide piece of 1/32" balsa. 


I then snap the pieces off to make rectangular shakes.


I lay the shakes down in courses. The shakes should run about a quarter of an inch off all edges--you can trim them back later if one side needs to be flush with a wall. I run a bead of glue in two lines for each course: one line where the bottom of the shake will meet the previous course, and one where the top of the shake meets the roof. When all the courses are complete, you can trim out the ridgeline with shakes running the other direction.


Cut a piece of Masonite hardboard and hot-glue the model to it. I usually do this before building the porch, which makes assembly a bit easier.


Paint your building dark sepia, they dry-brush it up to the desired color. For natural wood, this takes some experimentation with various shades of brown and tan to find the effect you're looking for. I opted for a very weathered look, however you might want a young town with brighter wood.

Good luck and if you have a question, feel free to drop me a line at knuckledusterharris@gmail.com.

Adios,
Ol' Knuckleduster


Friday, March 13, 2009

Basic Scratchbuilding, Part II; Building Construction

Welcome to part two of my scratchbuilding tutorial. Although only trial-and-error will teach you the nuances of how the process works, it is my hope that I can provide you with a foundation that will both help you avoid some of the big mistakes I made while learning, and show you that it's really not that difficult after all.

A note about the photos. They're not all from the same building! They were taken at random during the construction of an entire town for a convention this winter, at which time I had no idea I'd be writing this article. They illustrate the techniques, but not the construction of any one particular building.  

The first step is to design the building on paper. A 40mm scale saloon should be about six inches wide and seven inches deep.  I design the floor to sit inside the walls rather than using the floor as a platform for the walls. I design the side walls to be the same length as the floor and the front and back walls to go on last and cover the ends of the sides (they need to be wider by double the thickness of the walls, 3/16",  in order to cover them; so instead of 6 inches wide, make the front and rear walls 6 3/8" wide). The walls should be about 3" tall, and the roof is made by cutting out a triangular truss and gluing two roof plates to it.

Your basic measurements for aforementioned saloon would be:
Floor: 6 x 7"
2 side walls: 3 x 7"
Front, 7 x 6 3/8
Rear: 6 3/8" wide. 3" tall on each side and 5" tall at the peak.
Roof: One panel 7 1/4 x 4" and another 7 1/4 x 4 3/16 . The wide panel will overlap the narrow panel at the peak, although the angle will not be perfectly 90%. You will need to trim the excess a bit.
Truss: a little triangular piece three inches long on the bottom and the same angle as the peak of the back wall.

Should I every really get ambitious, I will create a file of "blueprints." You can create your own designs by studying photographs of old western buildings or using commercially available cardstock buildings such as Whitewash City as a pattern, making adjustments to account for the 3/16" wall thickness.

Once the basic design is made, mark your foam core, making sure everything is square. Slice the pieces out with a razor knife. Take care not to slice your fingers off during this step, since it slows down the remainder of the process and leaves nasty stains on the finished model.


Last time, I gave you a laundry list of tools and materials.  Not included on that list were ready-made architectural elements. I recommend using pre-assembled plastic or metal windows and doors--they don't cost a lot, and save you a lot of time. I've found that building the windows and doors is the most time-consuming part of scratchbuilding. 

If you are using ready-made architectural elements like these, mark their position carefully on the walls and make the cuts before assembly of the building . Make sure you have thought through what part of the window or door needs to be recessed, so that you don't end up cutting a hole too large. Test fit before you continue assembly in case you need to throw out a wall and start over.


After the cuts are made, do your basic assembly with a hot glue gun, wiping off the excess before it hardens (don't use your fingers!). The photo below is sans its front so you can see how it is constructed, and its roof, which will not be attached to the building permanently. At this stage, it is quite imperfect; don't let this discourage you; the siding and details will cover the imperfections.


It is important to assemble the building completely before gluing on the siding. Assembly helps protect the walls from warping, since they are held straight on three edges.

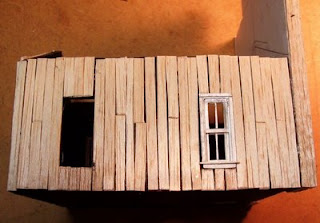
After the building is assembled, measure and cut siding. I do it in large batches, which saves time in the long run.


When cutting trim, I use the snips a lot. I tend to keep them in one hand and snip about every third piece in half to create butt joints in the middle of the wall for a nice rough look.  I don't worry about cutting each piece of siding to precise length during gluing. Rather, I leave the siding hanging over the top and trim the entire wall at once after the glue dries. This one simple technique saves an immense amount of time and fuss.

Glue the siding in place. To minimize warping, take care not to use more glue than you really need to get the siding to stick.  If a piece of siding wants to curl, super-glue the ends in place while the white glue dries. Trim out the corners with additional balsa.


Using ready-made or homemade architectural elements, trim out the building. Super glue is very useful for securing these delicate parts. I have used Grandtline's porch railings and gingerbread trim to great effect, and I use my own Knuckleduster pre-cast windows and doors. Trim work requires some research. I have found numerous photos of old buildings on the web.

Next time we'll make a cedar shake roof.

Until then, Adios!
Ol' Knuckleduster